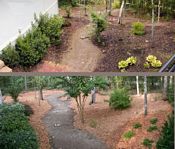
LandscapingThis is the first time we have bought a house without having landscaping taken care of by the builder and included in the purchase price of the house, although we did do extensive landscaping on a house we had in Houston. Here are some things to think about when starting to plan your landscape: Grass lawns are not a requirement in HSV. If you want a low maintenance landscape, you can get the lot covered with mulch and rock for a few thousand dollars, including a few plants. Not having grass does not mean NO maintenance. Weeds come up in gravel, even if it has plastic weed barrier under it. Dirt and weed seeds accumulate above the barrier and the weeds come that way and through holes which may develop in the barrier. Mowing grass is actually the easy part of having a lawn. Edging is the time consuming part. Many people hire lawn services to take care of their yards, even if they don't have grass. Such lawn care includes blowing leaves into piles and removing them, pruning shrubs and trees, spraying weeds, etc.
Do-It-Yourself LandscapingYou can buy plants and put them in yourself and save a lot of money. But before you buy the plants, you should try digging a hole first. The soil in most places in HSV is not made for planting. We bought a couple of Bradford Pear trees before talking to a landscaper and tried planting them. We could not even get a shovel into the ground. The "topsoil" on our lot is made up of rocks, tree roots, and smaller rocks. (When they clear a lot of trees, they don't take the roots out too!) After we bought a pick and could not get IT into the ground, we eventually gave up and left the trees for the landscaper to plant using a small backhoe. An alternative to doing it all yourself is to hire someone to do the heavy work while you do the design and buy the plants. A neighbor who did his own yard bought all the plants and hired some young men from Teen Challenge to dig the holes for them. He didn't want grass, so he did not have the trouble and expense of hauling in top soil. Instead of buying truck loads of hardwood mulch, he raked up pine straw which is plentiful in this area. Another neighbor, who was a professional landscaper himself, hauled in at least a couple of dozen truckloads of compost that the city of Hot Springs provides to the public for free. His yard is a showplace. If you have a large and/or sloping lot and/or want grass, the cost goes up quickly when you add retaining walls, flagstone paths and patios, sprinkler systems, and of course the more plants and larger plants and trees you get. We have heard of people spending over $200,000 on landscaping, but of course that is extreme and rare. More common is something in the $5,000 to $25,000 range.
Choosing A LandscaperWhen we chose a builder for our house, I felt pretty confident. We got bids and checked the builders' past work. We pretty much knew just what we were getting for the money and the quality to expect. We tried going through the same procedure with landscapers. We talked to about a half-dozen different ones, drove around and looked at their work, and got designs and bids from them. In the end, our selection method was about as scientific as sticking pins in the yellow pages. We had to pick the plan we liked the most and hope for the best. The problem is that unlike building a house, there are few or no standards for landscapers, so bids are almost completely meaningless for comparison purposes. You may get identical bids for similar looking designs, but end up with different looking landscape jobs of vastly different quality. The only way different bids will be comparable is if you specify the same plan and the size and exact variety of every plant and boulder. Good luck on that. |
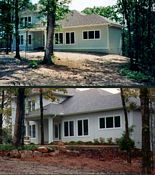
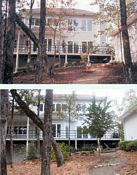
Before | After |
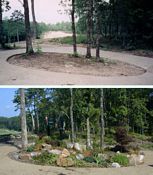
In front of the deck, Myron mounded up dirt around bolders to block the view under the deck from the front of the house:
Before... |
1999: |
2001: |
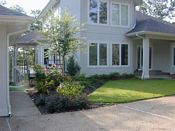
2002: |
|
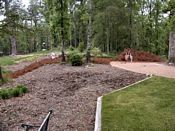
From the golf course: |
From the center: |
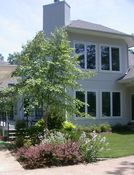
While we loved the landscaper's design and the amount of landscaping we got for the money, he may not have been a plant expert. He put a fast growing, extremely messy River Birch tree right up against both the house and the garage, which any gardening expert should know is a huge mistake. Some of his plant choices were not appropriate for the zone we live in or needed to be planted in different conditions, such as plants being put in heavy shade when they require full sunlight.
Kay and I have been Master Gardeners since 2009 and wish we had known in 1999 what we know now. Also, a lot more information about plants and landscaping is available online now, so it may be worth researching the plants in your landscaper's plans before signing a contract.
The Elements Of LandscapingMulch -- You have to decide where you want mulch, what kind of mulch, and how thick you want it. Below are some different types of mulch, in order of increasing cost and lasting power. The Hardwood, Cedar and Cypress were all shredded wood.
Regular shredded wood mulch will eventually (1-3 years, depending on type of mulch) erode away and have to be replenished, making it a maintenance item of sorts. An alternative is to cover the ground with plastic (to keep out weeds) and cover that with gravel. In theory, this makes the area maintenance free. In practice, the plastic tears and weeds come up through it anyway. We specified mulch because we think it blends in better with all the woods around our house. In areas where houses are built closer together, creating a little more of an "urban" environment, the gravel looks fine. It is also safer to have close to houses because wood mulch is flammable. We used to have a pine straw covered path around the back of our house, but got nervous enough to replace it with gravel eventually. 3-Year Update (2002): After three years, the original mulch was pretty much gone - decomposed or whatever. The pine straw was still holding up, except where a hard rain had created ruts in it recently. Of course, we put the pine straw on pretty thick... We decided to put in the new mulch ourselves to save money. For example, an area in the back that Dirt Cheap wanted $700 to cover with mulch could be covered by about 7 yards of mulch easily. And that would be spreading it a lot thicker than Dirt Cheap did. At $20 a yard, that would be about $140. We hired a bobcat and driver to carry the mulch to our back yard. The time he spent on that one area probably cost us about $30, so for a total of $170, we did what Dirt Cheap wanted $700 to do, and we used better mulch laid on much thicker. This is not to bad-mouth Dirt Cheap. Any landscaper is going to charge comparable (or higher) amounts for things you could do for yourself, ummm, dirt cheap. |
So when we got two more truck loads to go in the back, we hired a bobcat and driver to do the work. It took him three hours to carry two truck loads from the street 200+ feet to our back yard. Had we carried it a wheelbarrow at a time, it would have taken us weeks.
The bobcat driver spread the mulch around some as he dropped it, and I levelled it out with a hoe. Then rested while he went for the next load. This was much easier than using a wheelbarrow and well worth the $150 he charged. |
As you can see, the cedar mulch (bottom) is a lot lighter than the original hardwood mulch (top). We expect it to darken up after awhile. One nice thing about the cedar -- it smells real good! |
2004 and 2009:
In 2004, the shredded hardwood up front was getting pretty thin, so we put pine bark on top of it very thick. Five years later, it didn't look too bad, but weeds were starting to break through it pretty easily. By 2009, the cedar mulch in the backyard was also pretty thin, so we hired a landscaper to redo it with pine bark mulch while doing some other landscaping around the yard. We did not get him to do the front because we can do that ourselves relatively easily, so a few months later we got 10 bags of pine bark mulch from Wal-Mart at about $2.40 for a 2-cubic-foot bag (or $32.40/yard). It did not make much of a dent in the area, so I ordered a load from Rock Bottom, estimating that it would take about 15 yards, put down thick, at $22.50 a yard with free delivery. Turns out that half that much would have been plenty, but the excess allowed us to put it down even thicker than planned. We should see no weeds coming up in that area anytime soon. 2014: For several years, we have been using the free compost from Hot Springs in place of mulch. We also use it in place of potting soil. Some people say that vegetables should not be grown in it but experts have said that it is safe. Finally, we sometimes use it in place of fertilizer on lawns and plants.
"City pit" is just clay and rocks. Not much, if anything, will grow in city pit. Landscapers use it to fill in areas, such as levelling up a yard. Then top soil is put over it for planting. The problem is that they may only add 4"-6" of top soil. Of course for a large plant or tree, they will dig a hole deeper than 6" and fill it with good soil. That does no good. Since water will not flow through clay, you end up with a hole of dirt surrounded by clay which holds water, rotting the roots of the plant. (Even when digging a hole for plants in native soil rather than city pit, experts say not to fill the hole with premium soil because it encourages the roots to stay inside the hole rather than spreading. Instead, the hole should be filled with the same dirt removed when digging the hole.) A 6" layer of top soil may just be adequate for planting grass, but a layer at least a foot deep should be used for flower beds. Some flower bulbs need to be planted 8" deep or more. |
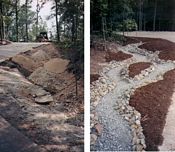
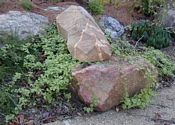
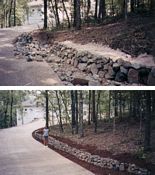
Update: I have noticed in yards with gray gravel that it tends to turn a little more brownish from dirt and leaves blowing across it. Also, the surrounding mulch eventually changes from a dark brown to an almost grayish color. In addition, we have had problem with rain causing ruts in the city pit path. So the bottom line is that we should have let them put the gray gravel on the path. On the two sides of the house which don't show and which have lots of trees and bushes close by, the builder had mounded up city pit around the foundation. Because nobody was going to see it, we didn't have anything else done to it, but the slope sides of the city pit have washed down. A retaining wall or rip-rap is really needed there, or at least some gravel on top to stop the rain from beating down on and washing away the city pit. Now it would be almost impossible to get a big load of stones or cement blocks back there to shore the sides of the city pit up. Update: We finally broke down and got a landscaper to level up the paths around the back of the house, top it with gravel, and shore up the sides with rip-rap. Because our last landscaper is out of business, we had to get a different one. Read about the problems we had on our home page under "Service Companies (Not) Worth Hiring". Rip-Rap -- |
Sprinkler System -- A sprinkler system will add at least $5000 to the cost of the landscaping. Since we have such a small patch of lawn, we opted not to get a sprinkler system. We neglected to consider all the shrubs and flowers which also have to be watered. In retrospect, it might have been better in the long run to have gotten the sprinkler system than to have to be bothered with putting out sprinklers and hand watering the rest of our lives. Our friends who built on Lake Balboa get an additional bonus of being able to pump water out of the lake for their sprinkler system. UPDATE: We got tired of all the hand watering. The grass didn't take much effort, just putting out the sprinklers, but hand-watering everything else took too much time, so we broke down and got a sprinkler system. We got bids from four or five companies, and the landscaper gave us the best price. In fact, we got a better price than if we had gotten the sprinkler system at the time the landscaping was done, probably because we were getting separate bids for it. Our friends who built the same time we did and who got a sprinkler system at the same time as their landscaping advised us to get a drip system rather than a spray system. The advantages of the drip system are:
Despite these apparent advantages, our landscaper strongly recommended against any use of drip outlets. For one thing, drips cannot be used to water grass, of course, but they also claim that the drip tubes have to be replaced regularly (every couple of years or so) and that they just do not work as well. [Feb. 2010 Update:] A speaker at a Master Gardener's class said that he has used a low-pressure system for 5 years and hasn't had to replace anything. He is using it in the shade. Not being exposed to the sun nor buried in the ground may cause the hose to last longer, or the hose may just hold up better than I was told. He also says that it doesn't freeze during the winter because the holes where the water comes out let the water escape during the winter. Other people who use some or all drip systems seemed pleased with them, but we decided to go with what our landscaper recommended. Drip is cheap and relatively easy to install, so if need be, we could add it later. By waiting a year before getting a sprinkler system, not only did we save money, but we were able to plan the system to include areas of the yard in which we did not originally plant. This is a significant advantage, unless you are absolutely determined that you are not going to add anything after the main landscaping job is done. The drawback to waiting is all the time we wasted hand-watering, plus some damage was done to the grass and plants in burying the pipes which could have been avoided by doing the sprinkler system first. One argument we had with the installers was the location of the control box. We wanted it in the garage where we could easily get to it and where it would be protected from the elements. The installers wanted it outside (easier to install, I guess) and claimed that it is element-proof. We had one in Houston and the "element-proof" controller deteriorated being outside. When we had it replaced, that installer claimed it should have been put in the garage. Element-proof or not, it is definitely more convenient in the garage, especially if it's pouring rain and you want to shut the sprinkler off. Also, after having the controller lose its settings whenever the power blipped, we bought a battery backup for about $50. We wouldn't have been able to add this outside. Sprinkler System Update -- We have been very happy with the sprinkler system over the years. We've had virtually no problems with it. However, in Aug. 2005), we had a technician out to add some new spray heads and change some nozzles to different types to adapt to new areas of plantings we have done. He also had to add extensions to some sprayers in or around shrubs to compensate for their growth. We also had him put in a rain sensor to keep the sprinkler from coming on when it has been raining. One problem we have is that with all the new outlets, we barely have enough water pressure to drive them all. The tech said it would be too costly to add a new controller and valves to add more zones. The original controller only allows up to four zones. Toro (the brand we have) has a 6-10 zone controller which costs only about $100. It also lets you program the controller with your computer. Newer controllers (2016) let you adjust the controller and turn the sprinkler on/off via the internet. Full Circle -- If I had it to do over, I might not have a lawn installed and would have used plants which require watering only in times of severe drought (thought that is pretty much every summer). The motivation for all this is that we have a very high water bill during the watering months. When we bought the lot next door, I was determined not to have to water plants (except when they are getting established and during extreme drought). Some plants which do require water bloom in the spring months when rainfall is normally sufficient. These include daffodils, irises, hyacinths, etc.
Grass -- Again, you can easily get away without having a grass yard, and we had about decided not to have one, but the landscaper convinced us that a grass yard in front would look so much better that it would be worth the trouble and expense. |
Out "back" (the side which faces the 15th fairway's pond), our lot slopes down a long way with a lot of trees and undergrowth at the bottom, so we decided on a more natural looking landscape without grass. |
PlantsBecause the lots in our area are thick with hardwood trees, we still had an abundance of trees -- red oaks, white oaks, hickories, cedars -- even after knocking down the pines. As a result, we did not have to spend much on new trees, which is where a lot of money can go in a hurry. Even so, we did get a River Birch, a cedar, and a couple of Japanese Maples. Although we had some ideas about what types of plants we do and do not like, we are not plant experts and were at the mercy of the landscaper to suggest plants. The landscaper's biggest mistake was putting plants in direct sunlight which require full or, at most, partial shade. Examples: Hastas, Ferns, and, more expensively, a large Blue Cedar (which only lived two years) and two Japanese Maples, one of which died in three years. We have been told that the Blue Cedar didn't stand a chance in this environment. We finally had to transplant the Ferns and Hastas to shadier areas. We replaced the Hastas with Gardenias and the Ferns with Dwarf Nandinas. Both Gardenias and Nandinas like the sun. After all the planting was done, we bought about 250 bulbs -- bearded iris, narcissus, crocus, and daffodils -- and filled in some areas which we had the landscaper leave blank for us. |
Click on this line to take a virtual tour of our landscape.
Final AnalysisFour-year update: When plants are being put in, they usually are much smaller than they will eventually grow to be. It may look funny the first year or two, but you must leave room for the plants to grow, especially in beds next to the house. If you can't stand all the empty space around them for the first couple of years, you could fill it in with annuals until the plants reach their full size. You can check the tags that come on the plants to see what their eventual height and width will be. If a plant is going to grow to 10' high, you probably do not want to put it in a place where it cannot be allowed to grow that high, such as under a tree. Likewise, a plant that will get to be 4' wide should not be put in a bed which is only 2' deep. First of all, it will be lopsided if it starts only a foot from the house and forced to grow out. Secondly, if you have a yard, driveway, sidewalk, etc., adjoining the bed, you will constantly have to be cutting it back. So save yourself a lot of work and grief in the long run by checking the specs for the plants and making sure the landscaper is giving them plenty of room to grow. Keep the tags. Try to get the tags off all the plants and store them somewhere. If a plant/tree has no tag, ask the landscaper what it is and write it down. Don't be like us and find that years down the road, you have no idea what some of the plants are. We wasted a lot of time researching information we should have had from the outset. Different plants often have different requirements for soil type, pH, watering, fertilization, pruning, etc., which is where having their tags comes in handy. Update: The above was written in the days before digital cameras. Now I would recommend taking pictures of plants and labeling the pictures on the computer with the names, dates, etc. Information about plants is also much more abundant now than in 1999. Don't assume that the landscaper knows the light and water requirements for each plant. Get the plant list before they start planting and Google to see what the plants require. |