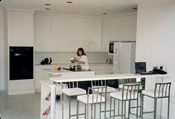
1999

2008

1999 |

2008 |
If you are building in HSV, chances are that your builder will send you to Metro Builders Supply in Little Rock to pick your appliances. They have a huge showroom with everything ranging from economy to the highest high-end appliances.
If you are putting out plans and specs to builders for bids, you should go to Metro first and select the appliances you want and put the exact brands and models in your specs. You are going to have to do this some time, and doing it up front lets you avoid having an appliance allowance in your contract.
The fewer allowances in your contract, the fewer surprises you'll get later. However, you should add that if a particular brand or model is no longer available, you will choose a replacement of the same price or adjust the contrat total for any difference. Any other changes to the appliances specified should be made via a change order.
For more about making specifications for a house to be built, click here.
Another good source of information is the Internet. Places like COMPARE.COM make it easy to compare features. You can also find web sites for all the manufacturers to get things like complete lists of features, pictures, and installation specs. Go to Google to search the web for information about products.
Relatively new kitchen appliances these days which can be built into cabinets or counters include steamers, electric woks, deep friers, exotic coffee centers, food warmers, pizza ovens, etc. We don't have any of these, so I have not discussed them here. Search the Web for info on them.
Refrigerator and freezer:
Our refrigerator died right after we moved here. We found out too late that if the movers tilt the refrigerator on its side (which they could do without your knowing about it), it can ruin the compressor. At the very least, you should leave the refrigerator upright for at least 4 hours after moving it to allow the compressor oil to settle back down.
We already realized that we would need a larger refrigerator than we previously had since we now eat all of our meals at home and trips to the grocery store are less convenient than in Houston where the nearest grocery store was two blocks away.
We got a 30 cubic foot GE, but it is still cramped -- especially the freezer. If you have the room, a stand-alone freezer in the kitchen (or even in an attached garage or utility room) will be handy.
We have even seen kitchens which have two refrigerator-freezers, although if you want to go this route, a more common solution is to have a large refrigerator with no freezer, and a matching freezer of the same size next to it. However, most of the units I have seen like this are "counter depth", so you will not gain as much space as it might appear.
December 2007 Update:
After 9 years, we repainted the house and decided to get a new refrigerator. The last one we got (above) was white, and since that time, stainless steel has become the hot commodity in kitchen appliances.
The only problem for us is that the cooktop, oven, microwave, and dishwasher are all black. If we got a stainless refrigerator, it would not have matched the others, so we went with the black, glass-front Jenn-Air.
The Big Thing in refrigerators these days are what they call French Door refrigerators -- a double-door refrigerator on top with a one- or two-drawer freezer underneath.
A drawback of these are that even with bins in the pull-out freezer, it is harder to get to things. Also, with the freezer on the bottom, early models did not have ice dispensers in the (upper) door, although they are now made with the ice makers up in the refrigerator area so that ice can be dispensed through an upper door. Last but not least, French Door refrigerator-freezers cost as much as 50% more than side-by-sides.
An advantage of the French Door style is that if you just open one door, you don't waste quite as much cold air, and when you open the freezer drawer, you waste substantially less cold air (compared to an upright freezer). Also, the 36" wide shelves will hold party trays, etc. as much as twice the size of side-by-sides. Finally, many people just like the looks of this style.
Cabinet depth vs "full" depth: Cabinet depth refrigerators are designed not to stick out past the edge of your kitchen cabinets. Not only does this cut down on the cubic feet compared to a full depth refrigerator of the same height and width, but cabinet depth refrigerators also cost more for the same cubic footage, for some reason.
Our house has a closet on the other side of the wall from the refrigerator, so we had the builder extend the refrigerator space into the closet space to make room for a full depth refrigerator without its sticking out past the edge of the cabinet. Unfortunately, the cabinet maker made the cabinets to the left of the refrigerator too wide, blocking just enough of the space into the closet area that the refrigerator will not fit into it, so our refrigerator still sticks out. By the time we realized what he had done, it was too late to do anything about it. The new refrigerator is just enough narrower to fit into the space.
The new side-by-side refrigerator-freezer we are getting has some nice features not in our old one: One is that the freezer has three full-extension bins at the bottom and 3 pull-out shelves above that, making it a lot easier to find things in the freezer. Another is a tall ice-dispenser unit in the door, making it easier to fill tall glasses or even pitchers. Finally, this dispenser is designed to let you get ice and water at the same time.
When we got the new refrigerator, we moved the old one out to the garage and the extra space comes in handy. With it in the garage, when we come back from grocery shopping, anything which we may not need for a while goes into the garage's refrigerator/freezer. Even with two large refrigerator-freezers, we were always cramped for space, so we got a 17 square foot upright freezer which we also put in the garage.
Cooktop, Oven and Microwave:
Since there is no natural gas lines in the Village, if you want a gas oven or cooktop, you will have to plan on using propane with a big propane tank buried in your yard. We opted for electric.
For a cooktop to put on the island, we liked the smooth, easily-cleaned glass cooktops. Most of them have knobs which stick up; Dacor does not. It has touch controls instead. Although Dacor is more expensive, we decided we liked it enough to blow the budget on it. These days (2007), more brands offer similar cooktops at lower prices.
Combination ovens come in many different combinations of standard oven, convection oven, microwave, and broiler.
We got a double oven with a microwave above and convection oven below. In addition, we brought with us a stand-alone microwave which also has convection oven capabilities. This gives us, in effect, two microwaves, two convection ovens, a regular oven, and a broiler - and a lot of flexibility in preparing meals.
Judy had a combo microwave and range hood above the cooktop in her last house, so that is what she chose to go along with a double oven in her new HSV house. There are two types of units like this. One blows the air back into the room, and the other goes through a vent pipe out the roof. We sure to specify which you want.
The advantage of venting through the roof is that you are assured of getting all those odors and hot air out of the kitchen. The disadvantage is that running a pipe up through the cabinets above the hood/microwave takes up most of that cabinet space and going through the roof with the exhaust pipe provides a potential leak point for the future. It also costs a good bit more to buy the exhaust pipe and install it, including cutting through the cabinet, ceiling, and roof and adding flashing around the pipe on the roof (plus repairing the future leaks).
Another feature we looked for (and got) in the microwave part of the combination oven was a door that opens down from the top instead of opening to the side. This gives you a place to pull food out so that you can check on it or stir it without having to carry it over to a counter.
Dishwasher, Disposer, and Compactor:
Because of the open concept which many houses now have, it is important to get a dishwasher with the quietest possible operation.
In getting Judy's house built in 2007, I learned that if you have an angled sink, like Judy does, you don't want to put the dishwasher too close around the bend, since opening the door can block the space where you want to stand at the sink when loading. At Judy's, the cabinet builder said that the width of the sink cabinet, plus a 3" space buffer he added before putting the dishwasher in, would allow room for the dishwasher to open without blocking the space for standing at the sink.
A garbage disposal is another noisy little devil. They come in 1/3rd, 1/2 or 3/4th horsepower, with the largest being the quietest, but also being a lot more expensive. We compromised with the 1/2 horsepower, but it is not as quiet as the one in the rental house we were in while waiting for this house.
We have never had a trash compactor, so we had no real inclination to get one now.
Gadgets For The Sink
On our sink, we have a soap dispenser and keep dishwashing soap in it. We can wash our hands or a few dishes without having to dig under the sink for soap bottles.
A hot water dispenser with its tank mounted under the sink is a real convenience for making a quick cup of tea, coffee, hot chocolate, oatmeal, etc. Unfortunately, we have had some problems with ours leaking. It was a rather dainty goose-necked model. We replaced it with a more rugged looking, circular handled version and haven't had any more leaks.
The newer hot water dispenser lets you turn the knob CCW for water hot enough to make hot coffee, etc., and CW for near-boiling water, which can be handy for getting grease or gunk off dishes, heating up a spoon for dipping hard ice cream, etc.
A spray nozzle is quite handy also. These days (2007), a lot of sink faucets allow the business end of the faucet to be pulled off to use as a sprayer so that you don't have to have a separate spray hose.
If you cook a lot of pasta and such, you may want to consider a fold-out pot fillers (water faucets) over the cooktop.
Kitchen sinks come in a wide variety of sizes, shapes, and materials. Google for "kitchen sinks" for more information.

|
2012 Remodel:
While replacing the countertops with quartz, we also got two soap dispensers, one for hand lotion and one for soap. We also replaced the hot water dispenser with one which dispenses both hot water and cool water. We replaced the steel sink, which showed scratches badly, with a composite granite sink which has been a big improvement. Just before the remodel we replaced the kitchen faucet with a faucet you can touch anywhere to turn it on/off. This is very handy when your hands are covered in gunk. |
Backsplash:
If you are going to have a tile backsplash, do not simply go by the appearance of a single sample tile. Get the tile store to open a box of the tile. If they do not have a box, consider another tile which they DO have in stock. Alternatively, see if they will order a box for you (preferably without your having to pay for them) so that you can see an array of the tile. Tile is usually pretty cheap, so even if you have to order a box, it is a small price to pay to make sure you get it right.
Judy picked a tile for her backsplash from a sample card. She even compared the tile on the sample card to the granite countertop she was getting.
Here is a picture from the back of the sample card: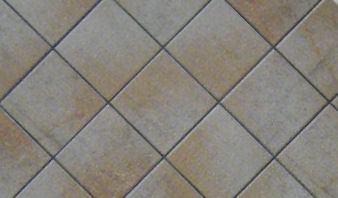
|
Here is the tile as it looked installed: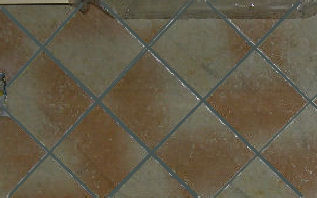
|
As you can see, there is a huge difference, and the only way to find out about such differences is to see a large enough set of tiles. Unfortunately, unless you actually purchase the tiles you need right away, you may not get the same colors or mix of colors at some distant future date as you look at prior to starting the house.
The only solution is to pick what you like early, but reserve the right to change tiles if what is ultimately purchased does not look the same. (This is where you will want to have taken a picture of the tiles in the first place.)
In our house, we have about 14' of counter space with a backsplash behind it. In Judy's house, she had about 13'. Since cabinets are normally no more than 18" above the counter, the square footage is 1.5 times the length of the counter, which makes it 22 sq.ft. for our house and just under 20 sq.ft. for Judy's.
When Judy saw how different the above tile looked from what she was expecting, she talked to her builder, Jim Buss, saying that she would pay whatever it would cost to replace the tile with something else. Buss generously offered to pay for the labor (including removing the original tile) if Judy would pay for the new tile.
At about $5.50 a square foot and ordering some extra tile for wastage, Judy's cost was only about $150. Since the kitchen is often the focal point of a home when visitors come over (especially in an open concept like Judy's), it was certainly worth $150 to make sure the tile matched the paint colors and looked good.
Central Vac:
Not a kitchen appliance, but we need to talk about a central vacuum somewhere. We've never owned one but talked about getting one and didn't. A few years ago, we again talked about getting one retro-fitted to the house, but again decided against it.
We talked to people who had them. Some swore by them, others swore at them. Keep in mind that you are lugging around (and storing) a 30' hose, so it's not all sweetness and light.
Since the 2012 renovation in which all carpet (and old tile) was replaced with new tile, our process is to vacuum to get large debris (if any), dry mop with Swiffer, then wet mop with Swiffer. We do this twice a week. We never wear shoes in the house, so that helps reduce any dirt and debris.
Appliance Web Sites:
Our kitchen cabinets were built by Danny Breshears. He also built the cabinets in the living room, the laundry room and in the master closet, the vanities and medicine cabinets and linen cabinet in the bathrooms.
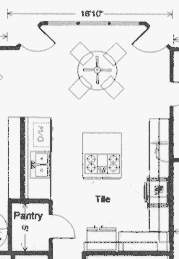
Before meeting with us, Breshears got the floor plan from the builder and went out to the house to take measurements. He used this information to put all the cabinet designs for each room into his computer.
For our part, we picked the kitchen appliances we wanted and downloaded and printed out the installation guides from the web sites of the manufacturers. We gave these to Breshears so that he would know how much space would be needed by the oven, the cooktop, and the dishwasher.
|
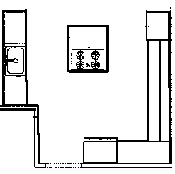
When we met with Breshears, we spent quite a bit of time at his computer fine-tuning the design and layout of the cabinets. For starters, we had put the built-in oven in the middle of one wall of cabinets. This was not desireable because the top of the oven cabinet sticks out farther than the tops of the surrounding cabinets. I had placed the oven in the middle because I thought it should be close to the cooktop, sink and refrigerator. |
|
Breshears suggested moving the oven down to the end of the cabinets rather than having it stick out in the middle. He pointed out that an oven doesn't have to be that handy because you normally put something in it and then leave it for a long time. |
To make matters worse, my plan had a built-in area next to the oven to put our stand-alone microwave. Like the oven, the microwave sticks out more than the upper cabinets do, so either the microwave's cabinet was going to be sticking out or the cabinets above it would have to be enlarged.
Breshears moved the microwave into the small area next to the refrigerator. (See the picture at top.) This allowed him to bring out the cabinets above and left of the microwave the same distance as the area for the microwave, rather than having the microwave stick out by itself. Since the refrigerator next to it and the cabinets above the refrigerator already extended out, the microwave fit in nicely.
We could have just put the microwave on the counter, but having it built into the cabinets saves counter space.

|
Breshears has a large shop where he makes the cabinets, then he brings them out and installs them. |
For our contemporary look, we wanted painted cabinets with no trim. We would have preferred clad (e.g.: formica covered) rather than painted, but the local cabinet builders don't seem to have any experience with that.
We picked a countertop surface first, then matched the cabinet paint color to the countertop material. When we had the interior of the house repainted, we decided to paint the cabinets the same as the trim color, which was the same color used for cabinets in other rooms.
The kitchen has 9' ceilings. Common practice is (2008: used to be?) to not build cabinets all the way up to the ceiling, since most people would have trouble reaching the top shelves anyway. Some people use the space above the cabinets to display knick-knacks. An alternative is to sheetrock over the space from the top of the cabinets to the ceiling to make it less of a dust trap.
In our last house the kitchen had 11' ceilings, so we had another set of cabinets built above the regular cabinets. We used this space to store seasonal decorations and other seldom-used items. A step stool stored in the pantry could be pulled out to reach the cabinets when needed.
With the 9' ceilings in this house, we didn't have room for a full extra set of cabinets, so we just ran the regular cabinets all the way to the ceiling. This gives us extra storage space and costs very little extra compared to stopping the cabinets a couple of feet below the ceiling as is usually done.
Kay did not want lazy-Susan corner cabinets. She really didn't want pull-out shelves in the base cabinets either, but since Nelson is 6'4" and would have trouble navigating the lower shelves if they didn't pull out, Kay relented.
Kay's main concern with lazy Susans and pull-out shelves was that things tend to fall off the back of the shelves and then are a pain to get out. Lazy Susans can be built within a round case inside the cabinet so that nothing can fall off, but then you give up some shelf space. The pull-out shelves built by Breshears have high backs to them so that nothing can get pushed off the back.
Some corner cabinets are put in at a 45-degree angle so that you don't have to deal with hard to reach corners. This would not have worked well with our cabinet layout, but it is a good idea to keep in mind.
Update note: Having pull-out shelves behind cabinet doors is not the ultimate in ease of use either, it turns out. First of all, you must open both doors all the way before you can pull out a shelf. Then you pull out the shelf, then push it back in, the close the doors.
Call me lazy, but the four-step process can be cut in half by using drawers. We have seen other houses which use them and they look fine.
For Judy's house (see below), we specified all drawers rather than cabinets with shelves. We will report how that works out when it is done. For pictures of the kitchen with drawers, see below.
Whether or not to have an island is pretty much dictated by the size of the kitchen. If you have one, then you have to decide what to put on it -- the sink, the cooktop, or nothing but work space.
We put the cooktop on the island. The drawback was that it would have been difficult to install the type of exhaust vent which goes over the top of the cooktop, which is the best place to have it. Instead, we used a pop-up vent that rises up about 6" out of the island at the back of the cooktop. It runs the full width of the cooktop. An extra-cost option lets the blower motor for the exhaust fan be located outside. We had an inside blower in our last house and it was very noisy.
The end of the island opposite the cooktop extends out another foot past the end of the island cabinet. This area provides room for a couple of more people to sit and eat if we have a crowd over. Not once have we used it for that purpose because a breakfast table and a dining counter are nearby.
A better use of that space would have been for a wine cooler or wine cooler or even just extending the cabinets underneath to the edge of the countertops to make then easier to get into..
Our last house had a thick slab of Corian in the kitchen and we intended to have it in this house. However, Corian is now made thinner and is applied to wood to provide thickness, so it is a lot cheaper.
You can even have molded sinks with Corian, although we opted for an undermounted stainless steel sink for better wear.
We also looked at granite counter tops which were comparably priced to Corian. The granite was beautiful, but it does require some maintenance, needing to be sealed at least once a year.
Since we could not see any downside to Corian, that is what we chose.
Now that we have started moving in, we are getting a little concerned about the white Corian. In our last house, we were not home that much to mess up the counter, but we will be putting a lot more wear and tear on this one. Corian has color that goes all the way through, so stains can be buffed out with scouring powder or even with sand paper.
2008 Update: The white Corian has held up fine and not been a problem at all. If you look at the pictures at the top of this page, you will see that our kitchen was originally all white, which in retrospect was probably too much. When we recently had it repainted, we got the cabinets painted gray and also had a tile backsplash installed to break up the white.
2012 Update: The Corian countertops started showing some wear, so we replaced them with quartz. Unlike granite and marble, quartz is supposed to never need sealing. We were also told they would not scratch or burn, but we had a cutting board made of the quartz cut out for the sink and it is definitely showing cuts/scratches.
Granite countertop edges: If you want granite, you should also select the edge treatment you want in advance to put into your specs when getting bids. Click here for pictures.
Backsplashes: Kitchen counter backsplashes are another important feature to put some thought into in advance. Click her for pictures and ideas.
The kitchen sink counter is open to the den with a bar on the den side. (See the pictures at the top of this page.) Standing at the sink, you look across the den and out the front windows at the view (in addition to the views out the side of the house).
Our last house had cabinets hung above the bar. This gave some extra needed cabinet space, but it also blocked the view from the kitchen into the den, which we sure didn't want to do at this house.
The bar in that house was on the same level as the kitchen cabinets, so one sheet of Corian simply extended past the top of the cabinets to make the dining bar. Builders like this method because it is cheaper and easier. But a step-up bar has several advantages:
We spent a lot of time figuring out what we could cover the front of the bar wall with to protect against scuff marks. None of the options really seemed ideal.
Then one day we went to Horner's in Hot Springs to pick a front door. They have a long, curved counter in their main room. The front of the counter is covered with a flexible mirrored surface. They told us it was mirrored plexiglass and that it would stand up to anything. Marks could just be wiped off.
We told Craft about this and we decided to use the same material to cover the front of our bar. We were originally told that mirrored plexiglass is cheap, but it turns out that it costs more than a glass mirror.
Also, glass gives a much truer reflection than the plexiglass, which is difficult to mount perfectly flat.
We debated for some time whether to have glass or plexiglass, but finally decided that the risk of breakage or cracking or chipping was too high with the glass mirror, so we opted to pay the extra cost of the plexiglass.
Other alternatives we have seen include paneling which matches the cabinets and faux stone or brick. (Google to find sources.)
At Judy's house, she had her kitchen cabinets painted a beige shade, but the paneling on the front of the bar, she had stained since that would resist scuff marks better.
In hind sight, it might have looked better to paint the panels the same shade as the cabinets and put a clear coat over the paint to protect it.
One other problem we had with the bar at our
last house was that wood braces ("corbels") which supported the Corian made it difficult to get the barstools under the bar, much less sit under it.
The reason for the braces was to support the Corian which could have cracked without adequate support from underneath. We asked Craft if he could come up with some way to avoid having to use braces, and he did.
|
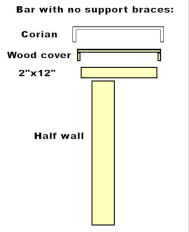
First he had a half-wall built up to the height of the bar -- about 6" above the sink's counter top. A wood plank was screwed down to the top of that wall.
A cover to fit snugly over the plank was made of wood on the top, sides and ends and covered with Corian. It was glued down to the wood plank. We are happy to say that we do have a Corian covered bar which runs 9' with no braces, and yet which is strong enough for us to stand on. (See the picture at the top of this page for the finished product.) |
What Craft did was rather complicated, so we could understand why most builders would just put braces under the bar, and we would be bumping our knees on them the rest of our lives. Once again, Craft went the extra mile for us.
When we had quartz countertops put on in the 2012 remodel, the contractor had thick steel plates screwed into the top of the half wall for the quartz to rest on.
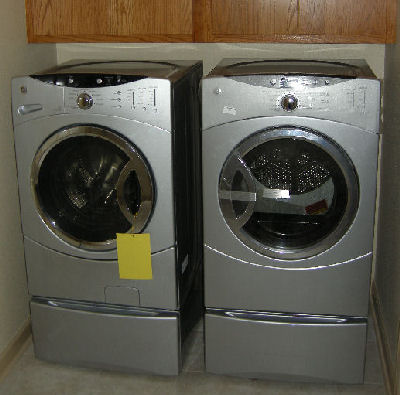
If you plan to have cabinets above your washer and dryer, leave plenty of space in case you currently have or may get in the future a front-loader washer/dryer with a pedestal base, which can be over 50" tall, depending largely on the height of the pedestal base. (See picture below.)
Front-loading w/d are deeper than top-loaders, and because they are also very tall (when installed on bases as they normally are), it may be difficult to get to normal cabinets installed over them.
One alternative is simply to bring the cabinets forward so that the front of the cabinets is just behind the top lip of the w/d. If you are going to do this, you may as well make the cabinets deep enough to reach the wall behind them, although this will make them VERY deep. Still, not doing so is just wasting space.
Another alternative I've seen is to put a shelf over the top of the w/d, though the top is high enough (50+ inches) where this may not be convenient.
The customary location for the water outlets for the washing machine is in the wall behind the washer. However, this ignores the fact that many people like to turn the water off when the washer is not in use to avoid damage from a hose bursting and flooding the house.
| In our house, the washer is in a corner and the builder wisely put the water outlets in the side wall where they can easily be reached. He also installed a single lever shut-off valve to make it eash to turn the water off and on. |  |
| The problem of access to the water cut-offs is worse if you get one of the big, heavy front-loading washers, particularly if it is mounted on a stand as they usually are. |
|
One way to prevent flooding in the laundry room is to have a drain installed in the floor, ideally with the floor sloped to the drain.
An additional option is the Intelliflow -- a device which turns on the water valves when it senses power to the washer and turns them off when done. At this time (2008), it lists for over $200, but Amazon.com has it for $162.
Another option is the Floodstop which cuts off the water valves when it senses water on the floor. The Floodstop also has a control unit with buttons with which you can turn the water supply off and on manually. Amazon.com currently sells this for about $125.
You can also get a device like the Floodstop for your dishwasher to prevent flooding in the kitchen. In fact, it is probably worth getting a drain put under the kitchen sink and dishwasher like the one in the laundry room. We have an instant hot water dispenser on our sink which has a small tank mounted under the sink. The tank of the first one we had leaked and caused some damage.
In the 2012 remodel, we had a drain installed under the kitchen sink, but we somehow missed getting one put under the refrigerator. A friend in our neighborhood had her refrigerator water hose break and it flooded her kitchen, ruining her wood floors.